This motor is more powerful than that used for the projector drive motor, and
for this reason cannot be connected directly to the power supply line without some
special provision being made to prevent an excessively high current from being drawn
by the motor upon starting. The starting apparatus used with this motor is illustrated in Figure 27. This starting device consists essentially of a sheet-iron box in
which are mounted a line switch for turning the power on and off, a resistor which
is connected in series with the motor armature to prevent an overload current from
being drawn upon starting, and a contactor which "shorts out" the resistor after
the motor has almost reached its normal running speed. The action of this device
is as follows:-When the main line switch is closed, a heavy starting current is drawn
by the motor. This large current produces what we call a "voltage drop" across
the resistor. The connections of the contactor operating coil are made from one side
of the line to a point between the motor armature and the resistor. When the motor
comes up to speed, the current drawn by the motor "falls off." The lesser current
reduces the voltage drop in the resistor, and, since there is less loss through the
resistor, the voltage across the coil becomes higher which causes the contactor to
close and short-circuit the resistor. The terminals of the coil are then connected
directly across the line, and, until the main line switch is opened, the operating coil
will keep the contactor closed and the resistor short-circuited.
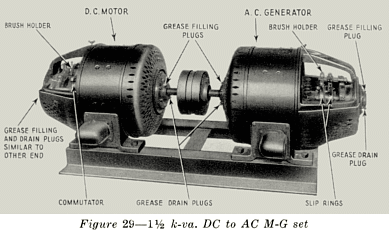
The generator controls are mounted on the control panel between the two
machines. On this panel are located a switch for turning on and off the AC power
to the amplifiers, a voltmeter for reading the line voltage supplied by the generator,
and a field rheostat for controlling this voltage in the same manner as that described
in section 24. In back of the generator control panel is mounted a fuse block containing fuses for the AC line from the generator. These fuses may be replaced
when necessary by removing the wire mesh cover. This is done by removing the
three nuts on the ends of the three bolts seen protruding from the rear of the panel.
21