92. Viscous Damping Device Used in the PS-1 Sound Heads.-The sprocket which pulls the film through
the sound gate is called the constant speed sprocket. It is driven through a viscous damping device
similar to that described in Section 71 for turntable drive. The purpose of this device is the same as
when it is used in the turntable drive mechanism; namely, to remove any unevenness of drive which
might be imparted by the motor or due to gear back-lash.
The adjustment of the device is also similar to that described in Section 71 and consists of adjusting the
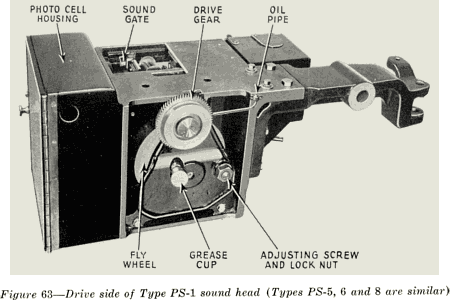
pressure of a felt washer bearing against the flywheel. The location of the adjusting screw and lock nut
on the drive side of the sound head is shown in Figure 63.
The damping adjustment is checked in the following manner:-Thread the projector in the usual manner.
Start the machine and when it is up to speed, press the thumb against the constant speed sprocket. Use
almost as much pressure as has to be exerted in opening the sound gate. When pressure is applied, the four sprocket hole loop between
the constant speed sprocket and the lower take-up sprocket immediately becomes smaller. When the
pressure is suddenly removed, the loop becomes larger and should oscillate several times, each
succeeding oscillation becoming smaller until the loop resumes its original position and remains
constant in size. If the damping mechanism is correctly adjusted the loop will make three distinct
oscillations, regain its normal size and remain constant thereafter. If the loop does not oscillate three
times, the adjustment is too tight, or if it oscillates more than three times the adjustment is too loose.
Correct for either condition by loosening the lock-nut on the adjustment screw and turning the screw
clockwise to tighten and counter-clockwise to loosen. This adjustment screw is on the drive side of the
sound head. Give the screw only a small fraction of a turn at a time and check the adjustment as
described. It may be necessary to repeat the operation two or three times before the correct adjustment
is obtained. When correct, tighten the lock nut with a wrench.
6