|
The Miracle Mirror Screen is shipped as a roll and is carefully
boxed, with the reflecting face of the screen protected by paper, inserted
during the rolling.
In the case of Type M-5, the tilted pattern, the top of the screen
is plainly marked, but all screens will usually be fitted with ties in the top
webbing, thereby not only indicating the top of the screen but providing a
preliminary means of hanging the screen from the hooks of the top
member of the frame, these ties being removed as the lacing is
completed.
Screen sizes are given in over-all dimensions, including the
webbing, in which latter the grommets are spaced evenly on
a inch centers, with extra grommets at the ends of all seams, which seams
are vertical.
The screen will be rolled upon a metal tube to stiffen the
package and must not be unrolled except to install it upon the frame.
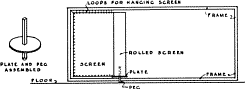
Accompanying the screen container will be a wooden plate
somewhat larger than the diameter of the roll.
In this wooden plate is a rectangular hole thru which a peg,
(also included in the package) may be thrust and nailed securely in
place.
This peg will be furnished long enough to enter the tube on which
the screen is rolled and yet leave a sufficient length below the plate to
position the upper webbing of the screen at lacing distance from the
upper member of the frame, when the entire roll, plate and peg have
been assembled and lifted to a vertical position. The length below the
plate may vary somewhat in every installation.
If this peg is rounded at its lower extremity, the entire roll may
be rotated freely upon the floor of the stage when upright, and the lower
portions of the screen will be protected by the plate from crushing.
Before starting the installation of the screen, it should be
determined how close the lower webbing of the screen is to be set to the
floor and the lower member of the frame.
A dimension should then be taken from that point to the hooks
of the top member of the frame.
This dimension should then be used to fix loops in the ties
affixed to the top webbing of the screen; that is by measuring from the
lower webbing of the screen roll to a point on the ties where the hanging
loop is to be made, using the dimension previously secured.
The operation of installing the screen is started by standing the
roll upright adjacent to the frame and as the loops in the ties are
hooked to the top member of the frame, the screen is unrolled by
rotating it and the previously described plate and peg, and at the same
time advancing the roll, plate and peg longitudinally in front of the
frame.
|
Lacing of the top member may then be commenced and if the
grommet holes of the screen are all immediately below the hooks of the
upper member of the frame, a loop type lacing may be used, but if the
relationship of grommets and hooks is irregular, then a diagonal type of
lacing should be employed. Usually the relationship will be correct as
respects the top of the screen and frame.
Once the screen has been unrolled and laced completely and
evenly to the top member of the frame, the bottom webbing should be
laced to the bottom member of the frame, starting at the middle of the
screen and frame and lacing both ways. Before lacing the bottom
member, the relationship of the grommets of the bottom webbing and the
hooks of the bottom member of the frame should be studied and if the
screen falling evenly itself, the grommets and hooks in a vertical line,
then the loop type lacing maybe employed, but if the relationship is
irregular, a diagonal type lacing should be used.
If upon completion of this operation, the screen lays evenly and
without folds in its final position, then the lacing on both screen ends
should be completed either by loops or diagonals, in accordance with the
relationship of the grommets and hooks at the sides.
If upon completion of the above operation, the screen still lays
evenly upon the frame, then the top and bottom lacings may be
gradually firmed, using
care not to exert too great tension at the individual grommets or in the
overall.
When the top and bottom members have been snugly laced, then
the end lacings may be completed, but only to the point of snugness,
since a tight lacing at the ends will tend to raise the middle sections of
the screen, thereby giving its face a reverse curve vertically.
It is usually desirable to snug all lacings progressively to the
extent, if necessary, of going over them several times.
If the screen should not lay evenly, after preliminary lacing upon
a TILTED FRAME, the trouble will probably be found in the frame itself,
which, in all probability, has not been tilted properly, and the ends of
which do not rise naturally.
In that case it will probably be necessary to lace the screen
unevenly as respects the frame: that is, the central portions of the screen
must be lowered and the outer portions raised, creating a smooth curved
relationship between the top and bottom members of the frame and the
screen itself.
This relationship between screen and frame members must be
adjusted until the screen falls evenly.
The final step in lacing is to install additional ties thru the
grommets at each end of all seams, tightening them sufficiently to
remove seam wrinkles.
Both in installation and subsequent care, the reflecting face of
the Miracle Mirror screen should be carefully protected since its
embossed surface and finish is the key to its effectiveness, and any
crushing, creasing, marking or tearing may not be repairable to full
efficiency.
|